Saturday, 24 October 2015

Decoupage on Tin

Hello Everyone!!!
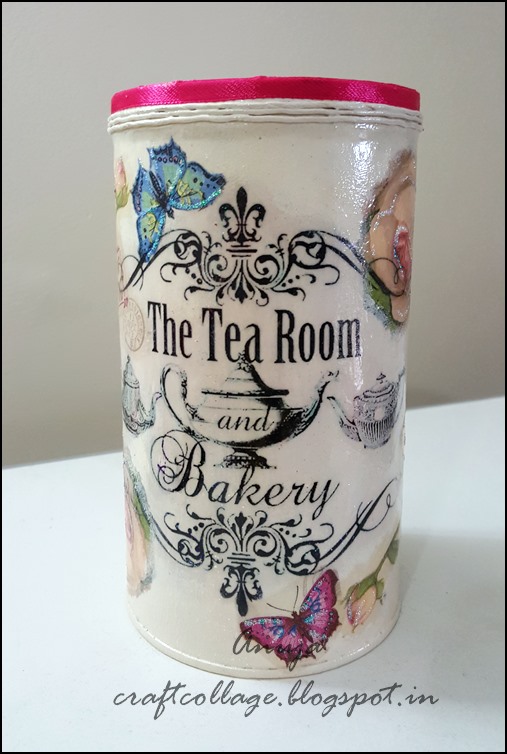
One more upcycled old cookie tin with tissue and image transfer....


Decoupage on a Cookie Tin

Step by Step instruction to upcycle an old cookie tin.
First I cleaned the outer surface with soap and water .Then scrubbed the entire box with sandpaper so that the paint will adhere easily.


With the masking tape covered the edges.


I used spray paint on the box (2 coats).
Printed the images from Graphic fairy on yellow copy paper.With Mod podge stuck the paper on the tin and let it dry for 3 hrs.Once it was completely dry used a wet cloth to remove the top layer of paper.


Cutout the images from the tissue and adhere it to the tin.


Once everything was dry added glitter to it.


At last I applied  2 coats Flat lacquer to seal the entire surface.


Thursday, 1 October 2015

Witch's Potion

I'm back after disappearing for sometime.....reason for vanishing is Decoupage......very soon I'll update all my projects.....
I found a Potion Bottle SVG online but unfortunately I could'nt use that file so I created a potion bottle box with Cricut design Space (awesome software).For the frame I added a transparent film at the back to give a little more dimension. Thinking of putting MM inside.


Friday, 21 August 2015

Altered Treasure Trove Step by Step Tutorial

I got this box as a gift for my Birthday from my sister-in-law ......what a thoughtful gift!!!
As soon I got the box so many ideas went through my mind....
it was a 12" by 12" box,pretty big one.
 I decided to try Image Transfer with Mod Podge ....so here I go lets get started.....


First I removed the hinges and the lock , gave a coat of Gesso and left it to dry completely.....then applied 3 coats of Beige color paint leaving it to dry between coats.


Printed the image from Graphic Fairy on three different color paper,chose the beige color.....very very pretty image.


Applied a thick coat of mod podge on the printed side and stuck it on the box....removed all the air bubbles with a brayer. Left it to dry overnight.


With a wet towel I removed the paper very slowly.VOILA!!!Image Transfer done.


Now time to do some decoupage......I cut out various parts from the paper napkin and aligned to see how it looks.


 Then I stuck everything with Mod Podge.


Added script with Crafter's Workshop stencil Art Is and texture paste.


Added glitter to the flowers and sprayed clear gloss varnish ......After finishing,the image looked very pretty  so I tried to hang it on the wall.


Linking it to

Thursday, 20 August 2015

Cracked Paint Decoupage box

Hi All!!!!
For this month Challenge at Simply Create Too Blog is "Anything Goes". So here I am with an Altered box. Let's get started now......

This box had a sheet of  mica covering the entire box ,I tried to paint on top of it but it didn't stick ....so I peeled the mica sheet from the box.


This is how it looks after removing the mica.....

For the cracked effect.....first I painted black all over and left to dry completely.Then applied a thin coat of crackle medium,left it to dry still it became slightly sticky. After that I painted white on top....within seconds the cracks will appear.

 Decoupage on the Box

The cracks are seen through the tissue.

Stamped and embossed the sentiment.....the rose diecut is from Elizabeth Crafts. Added color to the edges with distress ink.

Stuck the Hinges with E6000


Linking it to

Monday, 3 August 2015

Decoupage on Glass Candle

After a long time I did a candle....melted the wax and added my favorite perfume to it. Poured the wax into a 3"tall glass and let it to cool down for couple hours. I got these paper napkins from thecraftshop.in . I just took a part of the paper.....applied mod podge on the glass and stuck the tissue. I outlined the image with black permanent marker.Once it dried gave it 2 coats of Sparkle Mod Podge. To finish it off added the rhinestones to the top and bottom edge.


Mixed Media Card

Hello Everyone!!
This mixed media card was made for Eclectic Ellapu Challenge with a special recipe - 3 Dies ,2 stencils and 1 sentiment.
For the base I used Crafter's Workshop Brick stencil and added a layer of texture paint over the Crafter's Workshop Art Is stencil.


Painted Gesso on the square Chipboard , printed the image from Graphics Fairy and did an image transfer with mod podge . Distressed it around edge and added glaze to it.


The flowers we made with Tim Holtz Mini Tattered Florals die.