Friday, 28 February 2014

Fancy Fold Card

This is my 50th post and also extra special to me because I just completed One year of Blogging, to give myself a little pat on the back , I made this card.
I saw this card in the CARDMAKER Magazine….its was made out of 12 inch pattern paper.The card had an interesting way of folding.
I made the card with DCWV cardstock from Itsy Bitsy.The pattern paper had designs on 2 corners which gave a very nice look to the card. The tiny rose in the corner was made with Cheerylynn Cuties from Mansi (Diecuts and More).And for the butterflies I used Memory Box Pippi, Isabella,Vivienne and Darla Butterfly. Added pearl , ribbon and sticker.

1393577256229

1393577425265

On the inside I stuck a pink punch paper from Itsy Bitsy and added a flower (cuttlebug) to it.
Inkspirational Challene 50(Flower,ribbon and pearl)

Thursday, 27 February 2014

Cold Porcelain Keychain

My little boy asked me to make an Angry Bird keychain for him and I also ended up making one for myself.

1393569327861

1393502290632

Sunday, 23 February 2014

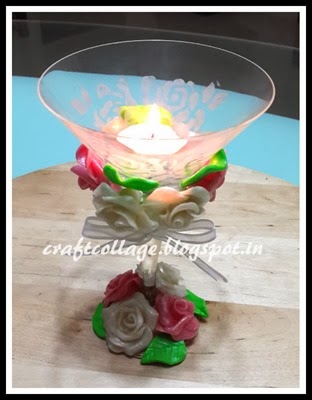
Cold Porcelain Decorative Glass

This is my first attempt with cold porcelain, an interesting material to work with. Cold Porcelain is like an air-clay but the texture is very very soft compared to polymer clay. When I made the dough, my kitchen was a mess and my hands were entirely covered with cornflour and glue (gooey gooey)..... but it was very exciting and had a great time playing with dough. Luckily my first batch turned out to be perfect.


Recipe for Cold Porcelain
Cornflour /Cornstarch - 1 cup
Glue - 1 cup (I used Fevicol)
Baby oil - 2 tbsp
Vinegar - 2 tbsp


Now my dough is ready......I found couple of ideas on how to decorate on glass , but it was in Russian language  and my computer couldn't translate......
decor1
First I hunted my kitchen for any glass jar or cups.... that's when I found this cocktail glass (last piece in the set). Next I wanted to try Glass Etching for quite sometime.I taped the Couture Creations Chloe (from Itsy Bitsy) diecut to the glass and applied the Fevicryl etching paste on top of it , left it for few mins and then washed it.....Wowwww got the frosty look!!!
decor2
decor3
decor4

Now my favorite part "making ROSES".
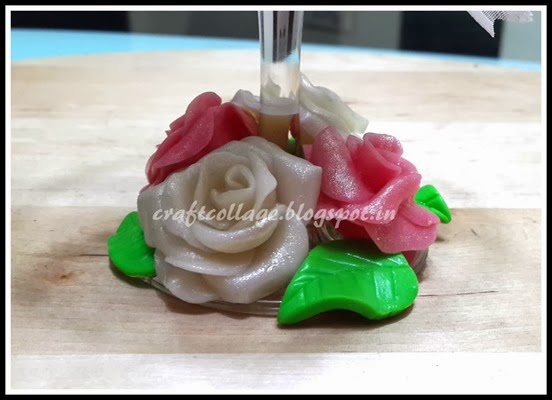
Added color to the dough and started making roses.....left it to dry for 2 whole days.
decor5
I wanted give a shimmery look to the roses so I used "Wink of Stella glitter brush" from thecraftshop , amazing product..... all my roses are winking at me.
At last I covered the entire rose with Mod Podge gloss finish and the leaves with Mod Podge satin finish (both from Itsy Bitsy).

With the help of the glue gun I stuck all the roses and leaves to the glass and finished it off with a simple bow (ribbon from Itsy Bitsy). It makes a nice center piece for the table.
decor9
decor7
decor10
decor11
decor8
decor12
decor6

Entering this project for

Sunday, 26 January 2014

Boite Rose (French) – Pink Box


Once again I leafed through my origami book and found this no cut folding box.  I made this box out of 12 inch square paper but it can be made with any size square paper.

edited 1


I started with pink pearlescent card from Itsy Bitsy , they have awesome colors. With MS scoreboard I scored all my folding lines.
For the band I used scrap white card with Marianne Ribbon 1 die. After embossing the die I added little color to it with Distress Spun Sugar inkpad.
One of my favourite tool is mini Bowdabra . I made that pretty bow with tulle in one minute….super fast.
Found a pink button from my kid’s old dress and added a small rose to it. The small flower was punched out from the scrap pieces, inked them on the edges to match the band.
The punch I used  was Jeff Flower from Itsy Bitsy.


edited 5
edited 6

To finish the box I added pearls and 3D liner to it. Added lighter pink card diecut from Spellbinders Decorative Label One to the base of the box. Storing this box is very easy just keep them flat in a folder.

edited 4
edited 3
edited 2

I normally don't like throwing away even small pieces of paper so now I so such of bits and pieces.
My tip to store these scrap papers,I bought 2 expandable folder added small pieces of color paper to the tabs. I sorted all my scrap pieces according to color and pattern. If the paper is very small I store them in a ziploc cover and keep them in the folder respective to their color. Folder doesn't occupy too much space and also user friendly. 

Saturday, 25 January 2014

Write up for a Gift Box

This is Nirupama a homemaker with a vision to start a school. I am popularly known as an Art class aunty in the neighborhood. Always with some innovative ideas in craft , kids including mine come to me for their school projects which i enjoy helping them with my time. Craft is one thing which has helped me even when the days are tough. It is my stress reliever and I am sure it is the same for most of  the crafters like me.

IMG-20140125-WA0000

This box was done for my daughter's school farewell day. Every year it has become customary of gifting her friends with something we make ourself. This year it is very special for two reasons. One is the way it was made and the other is my little daughter is finishing school this year. Now about the making, it was not a single person job, inspiration came from my sis-in-law(Anuja Sekar) . We started making this box in our Farm house in Bodi ,when all the family members met for Christmas last year(2013).Secondly my daughter’s friends have become so close to us that we wanted them to remember this year's gift for very long as they will be parting this year to pursue their college in different fields. I hope they enjoy it.

About the box
Any scrap can be used for enhancing the looks of our projects. A little planning. and foresight is what is needed. For this project ,the embellishments on top adds the zing. The oval shape was cut and embossed using the Cuttlebug, a must have tool for crafters.The bloomed flower was made from printed paper cutout using Spellbinders Bitty Blossom die and the pretty bows from Die-namics beautiful bow die. The sparklers and the pretty five petal flower gives a personalized touch as it has the names of friends. Opening and closing the box is very easy, just a velcro  does it.


IMG-20140121-WA0009
box1
box2
box3

Saturday, 18 January 2014

Altered Frame

The frame was given to me by my friend  Rupa . She gave this frame to everyone who came for the crafters meet in Bangalore along with Priya (color Conceptions) from Chennai. It was really great to meet other crafters with same passion.
Rupa asked us to alter this frame…..so this is what I came up with……..
frame
frame0
frame1
frame 6Finished frame with our pic at the meet
frame 7Made the ribbon bow with Bowdabra
frame 8And I also tagged everyone on the pic so that I can remember their name and the day when we meet.

Materials used
Inkpads – Black and Brown
Embossing Powder – Black and Clear
Stamps – We r memory Keepers Autumn saying & Hampton Art Butterfly /Script
Dies – Memory box Pippi Butterfly and Quilled Creations Roses


Entering this frame for
Itsy Bitsy Picture Bingo Challenge – Patterned paper, ribbon, inkpad, stamp, embossing pdr,  bigshot, copic marker, Mod podge.

Sunday, 12 January 2014

3D Cube Calendar

Happy New Year Everyone!!!!
I had a great time making this calendar especially the cubes......recently I bought We R Memory Keepers Gift Box scoreboard from Priya (Color Conceptions), awesome tool....box in a jiffy.
I was planning to make a calendar with Fluorescent colors, that's when I  saw this tutorial on waffleflower.com , perfect timing since I just bought the box making scoreboard. Made the boxes in 10 mins.

Materials used
Recollection Kraft cardstock
Fluorescent Cardstock -  Itsy Bitsy
Mdf numbers - Itsy bitsy
Quickutz alphabet dies
Spellbinders Rose creations die
Half pearl Sticker - Itsy bitsy
We R Memory Keepers Gift Box Punch Board (thecraftshop.in)
Martha Stewart Scoreboad
Sentiment stamp from Papertreyink
Cheerylynn mini fanciful flourishes 
set (bitsanpieces.in)


Adding this calendar to 

Wednesday, 18 December 2013

More CAS Cards

Another set of Christmas cards.....
For this card I used a small christmas tree stamp and martha stewart loop edge punch.

Sizzix embossing folder from Itsy bitsy and sizzlit tree.

Couture Creations Paisley border nesting die from Itsy Bitsy Store.

CAS Christmas Cards

Christmas cards are always fun to make.......
In all my cards only one element pops out , that gives the card a very simple and elegant look.
Diecut the shape ,with decorative scissors I made the border and added the twine bow to hang the ornament.


I embossed the ornament with gold embossing powder and used cuttlebug christmas folder for the background.

Punched out martha stewart snowflake, added a button with red twine.....drew the black dots with sketch pen.

With Itsy Bitsy circle die I created the snowman...isn't he cute!!!!

Adding to Dcam CAS Challenge , Itsy Bitsy Make It Festive Challenge

Monday, 9 December 2013

Popcorn Slider Card

My son wanted to give a small gifts to his teachers for the holiday season , so we decided to make something simple and fun. I found this tutorial on youtube.
I wrapped a popcorn packet with a cardstock....decorated with a coffee mug or an ornament diecut and added the ribbon to it. Now its ready to be given....
Fun gift to give.....relax and have popcorn during christmas holidays :)