Monday, 1 December 2014

GIFT from HOME to HOME with HOME

Hi Everyone!!!
Welcome to my blog!!!!
This is my first post for ECLECTIC ELLAPU blog as their Design Team Member. I'm on the Purple team and theme for this month Challenge is Christmas but not a card (ornaments, decorated boxes....etc).
The Christmas House was made from Papertrey Timeless Home template.The base was made with plain white card.


For the main door I used a rectangle piece of black card layered with small squares.And the wreath made from Cricut Christmas Cartridge.


The windows are from Spellbinders D-lite Window One, cut the window into half  and used both the bits.Added curtain and mistletoe to the window with a tiny bow.


Christmas Tree from IO Dies, Santa ,greeting and the tiny light bulbs are from my stash. 


Eclectic girly team have come with some awesome creations, hop on to Eclectic ellapu blog to see what they created.
Join us in our Christmas Challenge!
Looking forward to see your works!!!!      

linking to 
The Pink Elephant
Cards Galore Encore Challenge
Craft Hoarders Anonymous Challenge 
Craft Your Passion Challenge
Kraft Zone challenge
Imaginationsonline
 Beyond Grey

Friday, 21 November 2014

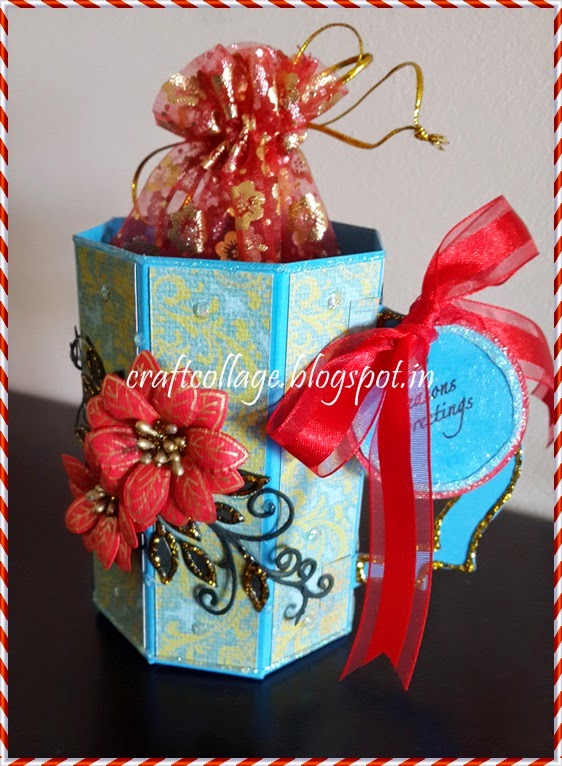
Coffee Mug Gift Set

For quite sometime I wanted to try this coffee mug from Scor-Pal blog.I tweeted the measurements a little to get wider and taller mug.The measurements are
5.5 x 10 inches , score at 1 1/8, 2 1/4, 3 3/8, 4 1/2, 5 5/8, 6 3/4, 7 7/8 and 9. For further instruction click here.


For the Poinsettia I used Heartfelt Sunkissed die, drew the lines on the flower and shaped them. Creative Expression Petite Vinery die for the leaves. Spellbinder label die for the handle. Added 3D glitter and a small tag with ribbon to finish it off......now my mug is ready for Christmas gifting.


Thursday, 20 November 2014

DT News

Hello Everyone
Delighted to announce now I'm part of  Eclectic Ellapu Design Team.Looking forward to share and learn from this wonderful group of crafters.


Here's a sneak of my first project for Eclectic Ellapu Blog. 


Stay tuned to know more about it.

Thursday, 13 November 2014

Say It With Flower " THANK YOU "

Hello Everyone
Welcome to the mid-post of our current Challenge #74 at 
I planned to do a CAS card with white on white background.


Dies Used:
Spellbinders Majestic Label 25
Memory Box Bicycle Die
Quilled Creations Spiral Rose
My teammates have made some awesome creations as well so hop on to our SCT Challenge blog to see what they came up with .And Join us in our Challenge! Looking forward to see your works !!!!!

Saturday, 18 October 2014

Golden Altered Bottle

Another Altered Bottle!!!!! 
This one took me on a roller coaster ride.....I redid the bottle 3 times to get the right look.


First I applied a coat of Tile and Glass medium on the bottle. Once it dried added a layer of texture paint with the sponge. Applied 2 coats of Gold paint.


Stuck the picture with Mod Podge. Once everything is dry, added the lace around the picture. Rose made with Spellbinders die. Added pearls, gold twine and ribbon to the bottle.


For the bottle topper.....a acrylic flower from my stash, a gold thread foam bead and a pearl.


Linking it to
Altered Eclectics Challenge
The Mixed Media Monthly

Friday, 17 October 2014

A Twirl in her Steps

A Girl's slipper collection is endless....
Now I started adding paper slippers to that collection.
Got the Template from the web,very easy to cut it. Pattern paper from DCVW. For the heel I used Scotch tape roll. I had a ball of time decorating the shoe.


Linking it to

Vintage N Royal

Oooooh!!!! Look at the idea what my 13 year old daughter SUMI came up with for her grandmother's birthday.
The design for the canvas started with her grandma's name - BHARATHRANI (rani means queen in Tamil). She decided that it has to be little vintage and royal.


Base coat is done with metallic gold paint. She layered Heartfelt Arianna bloom lace die with the envelope and the flower, all these are scraps from my previous projects.And she also created the checker look with 1 inch square cards.


Now with the Halie Prima Doll she wanted to create an Indian lady with Sari. I helped her with drawing a rough copy of how a sari looks. She completed the doll with a long plait hairdo, amazing to she how she came up with the sari and the plait.


The flourished chipboard alphabet and the paper doily from Itsy Bitsy. Painted the alphabet with Black paint. Added a golden ribbon and a butterfly.Finished off with a quote about grandma on the paper doily.

Linking it to 

Wednesday, 15 October 2014

Sparkle with Prima Doll

Inspiration for this project came from my T-shirt. I liked the quote "Give a girl the right shoes and she can conquer the world".


Started with a 8" x 10" canvas...
First time I finished the background with Gelatos and stamps unfortunately I spilled some paint on it so I had to redo it all over again.


For the Second time I didn't have that much of  patience so I did the background with Pearl paint and Stamps. Added Polka dot and swirls with 3D glitter paint.


Next is my Halie Prima Doll....it's like I've bought a new barbie doll. Oh it's so exciting to dress-up the doll,very easy to stamp and die-cut the parts of the doll.Glittered paper and a bling for the shoe. And I love that Poodle.


For the quote I tried to write it on the canvas but it was difficult so I used a frame colored with Gold paint. I'm trying to master my handwriting, just to cover up my flaws I used to glitter pens (gold and black).Those flowers a made with Joycrafts flower die, Heartfelt Arianna bloom die and Cheerylynn cutie die.


Added 2 small vellum Butterfly (Martha Stewart Punch).


At the end added a Gold glitter ribbon around the canvas.


These are the products I used 

 
Linking it to

Friday, 10 October 2014

2 in 1 Action Card

Hello Everyone!!!! I'm now part of the Simply Create Too Design Team. It's a group of like minded crafters from across the world who share designs ideas and also run challenges fortnightly for greater crafting community.

My very First Challenge for the Simply Create Too Blog


This is my first Halloween Card....I combined 2 actions in one card - Wiper and Shaker card.


Started with Martha Stewart Punch for the spider web frame,cut out the center and added an acetate sheet to it. Stamped and embossed the spider with black glitter embossing powder on the acetate sheet. Layer it on a white piece if card with foam tape. Also added small black sparkles inside the frame.


For the wiper which pops out I wanted only the spider to be seen so I used the Acetate sheet again. Spider from Martha Stewart punch.


 Pattern paper from Pebbles which I got as a prize from Lulupu. At last added the stamped pumpkin and the ribbon to it. This card fits into a  regular A2 envelope.


I'm entering the card into....

Tuesday, 7 October 2014

Altered Bottle

Idea for this altered bottle started at the 
crafters meet in Bangalore. After having loads of fun we decide a topic for the 
next swap,this time we went with Altered Bottle.
Since this is my first attempt at altered bottle 
I went with the easiest technique 
that's wrapping the bottle with twine.
Used hot glue to stick the twine.
After wrapping the bottle added a Jute 
flower made with Spellbinder die on top of the bow. 
At last I swirl wrapped a lighter 
color twine around the bottle.  
VIOLA!!! Bottle ready.


Wednesday, 24 September 2014

Classy Card

Hello everyone !!! CAS card with a touch of color, got the inspiration from the Craft magazine.
Started with 6 x 6 card , added a layer of black card (53/4 x 53/4) . On top of it added  another layer of white card and patterned paper. Heat embossed with the Hero-arts stamp and die-cut the Oval shapes . Added the ribbon and my favorite flower from Heartfelt Arianna Bloom.


Linking it with

Chic Classy Card

Here is another CAS card with pretty bow from Creative Expression by Sue Wilson.....


Linking it with

Friday, 5 September 2014

Drawing ink/ Mixed Media Card

As I was browsing for alcohol inks I found Tim Holtz video on how to create various background. Since I didn't have alcohol ink I tried it with waterproof drawing ink.


I used drawing ink and blending ink on glossy card to create these backgrounds.


For the green card....first layer the Memorybox texture shine stencil , apply the the blending ink.On top of it use the drawing ink to get that stenciled look.
Once it dried I stamped the images with Archival Ink.


Punched the butterflies with Martha Stewart Punch.


For the pink card I used Heroarts Script stamp.


I wanted to have a see through butterfly so I stamped and embossed on a OHP (acetate) sheet with Sizzix stamp and die set.


With Jewelry wire I made the word "Cherish".